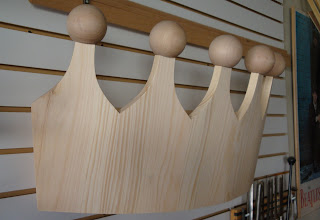
Hi everyone... its a nice day to work outside. Temps should be in the low 70's all week, pretty nice for November. This is a short post to finish the pine bed crown.
Ok, I installed the dowel supports and started to smooth out the front last time. Now check it out, the front is nice and smooth... (My Festool Rotex does a nice job removing the plane marks.)
I measure for the dowels by using a tape measure, since the holes are big enough.
Looks like 14 1/8, so off to the band saw to make the first cut (yes, first cut, there are always more). Fits pretty good, however I need to cut an angle on the end so the other dowel will sit flat in the center support. More cuts...
I made the angle cut on the right dowel, then measured the left and made a few cuts. Looks pretty good. I left some wiggle room, since curtains will be hung from the dowels, the extra room makes it easier to adjust the angled dowels into position.
Almost done... just have to hammer in the points... I use dowels and glue....
The crown has a slight angle, so when its mounted above eye level it looks better. You can see that in this picture.
And here it is all finished and up on the wall... good enough for Martha Stewart!
I hope you like the last two posts, and I didn't forget I will post the first steps soon! That post will include how to cut the lumber down to size and how the back, front, and sides all come together.
Thanks for visiting, I hope you come back again! Remember, comments and feedback is welcomed!


beautiful!
ReplyDeleteSwan, Thank you!!
ReplyDelete